Kissena Forum Archive

Bicycle Tech/Gear Discussion Thread

8105 comments · 108281 views

@Mark. You need to be lowering your saddle not raising it with longer cranks.

Without wanting to appear flippant, it depends more on the chainrings you have on the crank than it does the BCD. If you have a 52/36 compact then switching to a 53/39 won't require any change to the chain. However with a 50/34 you will need to add links to the chain. This is because , even though you shouldn't cross-chain from the 53 to the 25 or whatever you have on the back, in the event that you accidently do, you need your deraileur to survive.

You should be able to keep your original cassette, but it depends on the ratio. A lot of people run 11-23 with compacts, whereas with a standard front combo you'll need a 25 at the back. Personally I think you also don't need an 11. So 12-25 gives you access to the holy-grail of sprockets: the 16 !

I have no knowledge of BB30.

@ian -- thanks.  yeah i got the saddle height thing the wrong way around.

i run a 52/36 at the moment and that combined with my existing cassette (which i think is an 11/28) does the job for most occasions.  i wouldn't go out of my way to change it (and yeah yeah i know -- a compact is the new triple in fredliness) but at the same time i am not wedded to it either.  point being, if i found a good offer on a standard, knowing that it will fit with perhaps a few minor tweaks, i would probably go that way.


Mark,

Don't knock the compact, it is a fine thing even for racing. Let some folks tell you about Devil's Kitchen climb in tour of the Catskills.
JP likes the compact because of weight savings from smaller cogs. They are good for climbers, not for Freds. You are thinking of a triple, which is definitely Fredly.

36x28 is an awfully small gear. I usually have 39x26 and, frankly can get away with 39x23 for all but the steepest hills when I would rather give up (although I did get and use a 28 tooth for one of the L.A. climbs that Ryan sent us up last year).

If you used a larger chain ring, you would theoretically require a longer chain. But not much longer (1/2" pitch for the chain which contacts half the teeth on the front sprocket, so the difference between a 50 and a 53 tooth front sprocket would be 1 link). But you already have a 52 and the largest general people use is 53. This won't make any difference for chain length.

I don't know how compact cranks came into this discussion. You are asking about bottom brackets. The BCD will not make any difference in your drive chain considerations. That is solely to do with number of teeth on the sprockets.

You should use at least 172.5. Eric would say you should use 175. You have long legs.

Here is what quark says about OSBB (it is the same as BB30):

The BB30 bottom bracket was developed by Cannondale and appears on more bikes every year. It uses a 68mm wide shell and a 30mm diameter spindle, hence the name BB30. The shell itself is not threaded; instead the bearings press directly into the frame.

The most common BB30 bikes are Cannondale and Specialized. Specialized call it Oversized BB or OSBB and have an excellent guide to their bikes on their web site. Other manufacturers also use this standard. OEM BB30 cranksets include Cannondale's Hollowgram SI, SL and SISL2, and the Specialized S-Works Carbon. A BB30 crankset will not fit on a bike with a threaded bottom bracket shell.


thanks @dstokes. i mentioned compacts only in the context that if i had a chance to switch, and it wasn't going to cause problems, then I'd maybe do that. Good to know that compacts aren't too fredly but at the end of the day I ride a specialized so, you know, I am by default King Fred. I never actually use 36/28. I have for some time been thinking of switching out the cassette to something a little more useful and will probably do that when/if I get around to buying a power-meter.

Let me know if this isn't the right thread for this issue. One of you (I don't remember your name, sorry) pointed out to me on the new members ride that this clear plastic disc on my rear wheel that sits between the spokes and cassette is completely unnecessary. 

At the time it seemed like a trivial thing to point out and I didn't understand it. But now, with little more than 250 miles on this bike, this thing is causing me a world of annoyance. It somehow became deformed and is now causing a rubbing noise whenever I coast - presumably because the cassette has stopped and the wheel continues to turn. This started during my unintentional ride through the snow last weekend.

Anyway, as I was cleaning the bike earlier this week I couldn't see a way to make it stop, so my question is what purpose does it serve and can I easily remove it if it doesn't in fact serve a purpose? Thanks.


Let me know if this isn't the right thread for this issue. One of you (I don't remember your name, sorry) pointed out to me on the new members ride that this clear plastic disc on my rear wheel that sits between the spokes and cassette is completely unnecessary. 

At the time it seemed like a trivial thing to point out and I didn't understand it. But now, with little more than 250 miles on this bike, this thing is causing me a world of annoyance. It somehow became deformed and is now causing a rubbing noise whenever I coast - presumably because the cassette has stopped and the wheel continues to turn. This started during my unintentional ride through the snow last weekend.

Anyway, as I was cleaning the bike earlier this week I couldn't see a way to make it stop, so my question is what purpose does it serve and can I easily remove it if it doesn't in fact serve a purpose? Thanks.

 
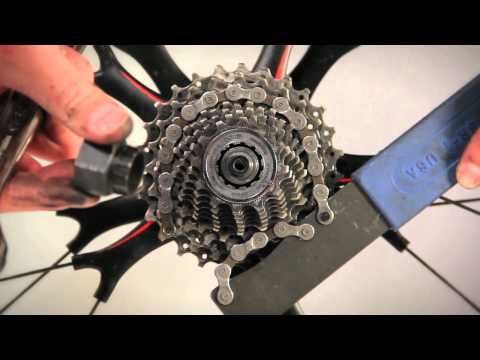
I think the purpose of this protector disc is to get you to buy your first few bike tools that you will use over and over and over again and learn how to remove your cassette!

Seriously though, this piece is there ostensibly for some lawyerly reason, to prevent your rear derailleur from shifting into the spokes of your wheel. However, your rear derailleur would have to be so far out of adjustment for this to actually happen.

Anyway, the tools you need are

1) Chain whip (universal to all cassettes)
2) freehub tool (specific to your brand of cassette)
3) LARGE adjustable wrench (universal, gotta be able to open those jaws wide enough to get around the freehub tool)

The job itself is easy (says me, the guy who is not exactly much of a mechanic), but someone should probably demonstrate it to you first. Maybe Stokes could include this in his next Mechanic's group tutorial? Alternatively, you could just try and crack and break that plastic piece off your wheel, although that seems sort of barbarian and maybe a little dangerous.
New bike features that are counterproductive to performance but demanded by lawyers:

spoke protecting plastic disk on rear hub - remove
reflectors on wheels and pedals - remove
tabs on front fork dropouts - file off

Oh, and when you get a new phone or tablet, you should of course root it immediately. One needs to be in charge of one's own destiny.


i asked the shop i bought my bike from the remove the disk when i bought it. consider asking the shop you bought yours from?  might be cheaper than buying the cassette tools (which you will use! consider this an excuse to buy them.) and more reliable than ripping it off yourself (though the risk of damage seems low, in the rocks-paper-scissors of metal-plastic, metal beats plastic).

This is probably the easiest home repair you can do. And really important. Being able to swap out a 11-23 for a 12-27 can make a huge difference for hilly races vs park races. Everyone should be able to do it. 

You need three tools:

Chain whip
http://www.parktool.com/product/sprocket-remover-chain-whip-SR-2-2

cassette lockring tool
http://www.parktool.com/product/cassette-lockring-tool-fr-5

big adjustable wrench 


park makes this cool combo so you can also remove pedals:

http://www.parktool.com/product/chain-whip-15mm-pedal-wrench-hcw-16


http://www.youtube.com/watch?v=hEAASx8ipsI
I've got the tools, but having said that, I've had success removing pie plates off my friends bike with a sturdy set of shears.

Hey folks -

quick question. 

When swapping wheels I often find I need to adjust my limit screws. 

Is it necessary to release the rear der. cable before adjusting limit screws? Or can I adjust the limits while tension is on the cable? 
Can I assume you you mean the following:
you need to adjust your limit screws but do NOT need to adjust the cable tension.

If so, that sounds strange and redundant to me. If your derailleur cable tension is correctly adjusted, then you do not even need the limit screws. The brifter will only allow the derailleur to move as far as the smallest or largest cog. The limit screws were useful in the old days of friction shifters, when you could in fact pull back on the shifter and send the derailleur pulleys into the rear spokes. They became redundant with the advent of "indexed shifing", which producted the clicking noise and took the guesswork out of how far to pull your shifter back in order to move the derailleur by exactly of cog.

If you insist on adjusting your limit screws, you do not need to undo the cable. Just ensure that the derailleur is not resting against the screw (i.e., put the chain on a middle cog), then adjust the screw, then test.

But you don't need them!

Here's how it works: You put your shifter in the position for the smallest rear cog. You adjust the cable tension so that it holds it exactly in the right place. In principle, that is all you have to do (though in practice that is not how you ensure proper adjustment).
Once you have set the tension correctly, then the shifter is calibrated to pull the right amount of cable to move the derailleur exactly the spacing of one cog (that's why campy and shimano are supposedly not compatible - the derailleurs are mechanically designed to require differing amounts of cable pull). If you click it 9 times (depending on how many gears you have), then you have moved to the last cog and you can't go any further. No limit screw required.
Mike,
I'm guessing it has to do with the position of the cassette relative to the dropout.  WHich is to write that you probably need to put a thin shim between the tallest cog and the cassette body on one of the wheels. 
@ Stokes

the problem is, when swapping wheels, the chain shifts into the spokes on some and not others. 

@ JP 

you're probably spot on. newer wheels are being built with slightly larger cassette bodies to accomodate shimano 11 speed, so I guess I'd need to throw a shim in there since I'm working with 10-speed. 


I added a shim behind the cassette on my training wheels to get them as close as possible to my race wheels, and slight adjustment is still needed.  But do be sure to check your brake pads as well.  On occasion, my pads rubbed the tires for a minute before I got off my bike and adjusted them, too.  I don't use my training wheels much anymore, simply because of all the effort.  They're now relegated to the indoor trainer, and they tell me they prefer being indoors, near the couch, anyway.  Lazy wheels...
That's Shimano for you. . .
Just throw away all the old wheels and start over with the new standard :)
you can adjust limit screws with a tensioned cable, but you run the risk of confusing limit screw adjustments (outward and inward limits of guide pulley) with cable tension adjustments (position of guide pulley within the limits set by the screws).  

adjusting your low limit screw while it's under tension is not advisable.  see attached photo, the result of some beer-wrenching.  do as dstokes says: shift to a middle or non-outer gear to adjust, then test your work by pedaling slowly and pulling on the cable/pushing the cage to shift by hand.  shifting by hand eliminates cable tension as a variable.

if you have SRAM, then the installation guide recommends that you use the high limit screw to position your g-pulley slightly outside of your smallest cog.  but your low limits screw should position the g-pulley directly under, tooth-for-tooth, your largest rear cog:

View the rear derailleur and pulleys from behind the rear of the bicycle.
Turn the limit screw marked ’H’ on the outer link of the derailleur to align the 
upper guide pulley center with the outboard edge of the smallest cog.
While turning the crank, push the rear derailleur towards the larger cogs by hand.
Align the upper guide pulley under the largest cog, center to center, by turning the 
limit screw marked ’L’ on the outer link. 
http://cdn.sram.com/cdn/farfuture/xfXtO8khRE9iIp6G5nTZPAUjpgAxsrCj9kn8006TJnU/mtime:1297962109/sites/default/files/techdocs/Red%20Rear%20Derailleur%20PRINT.pdf


it might also be that you're not tightening your cassettes equally; if they are not equally jammed into the cassette body, then they will shift differently because they are in different positions.  i realized once after visiting Ride that i'd left a few "clicks" of untensioned freedom after putting a cassette on.  the SRAM PG1070 cassettes I have feature detentes that "click" when as you screw it in.  when you feel no more of them, stop screwing in.  (or use a torque wrench...)

personally, i find these derailleur things nearly impossible to get 100% perfect in all gears.  mine always seems to want to make a clicking noise in 53x11 (it makes this noise when the chain hits the the widest and flattest tooth on the 12 cog that is visibly and measurably closer to the 11's teeth than any other).  luckily, i'm never in that gear!  maybe my hanger is bent...

another thing to think about is that the b-adjuster functions as a multiplier of tension adjustments.  when you adjust it to place the g-pulley close to the cog (6mm is the distance SRAM recommends) each 3mm pull of steel string has a more exaggerated effect than when you adjust the b-adjuster to be 8 or 10mm from the cog.
I'm thinking about getting Dura Ace C24 wheels (http://www.probikekit.com/us/components/wheels/road-wheels/shimano-dura-ace-wh-9000-c24-cl-clincher-wheelset.html).
It is my understanding that with a spacer, the 11 speed hub will work with my 10 speed Ultegra cassette. Does anybody know if everytime I would swap to regular 10 speed wheels, I would need to re-adjust my rear derailleur? I often change between race and training wheels...and i'm kind of lazy :)

thanks


That is corrrect and you shouldn't need to adjust your rear derailleur.  If it's not perfect, you can fine tune with really thin spacers.

Will Cane Creek headset fit my CAAD10?

Bottom headset bearing of 2012 CAAD10 is rusted out.  Top bearing is fine.    New CAAD10 headset is $80, but I only need one bearing.  I am not keen to replace the headset with the same kind that wore out so fast.

CAAD10 lower bearing (fork crown) race lacks any kind of seal again the bearing, which I think shortened this bearing's life.  Therefore I plan to replace it with a Cane Creek 110 Series SHIS:IS47/33 lower bearing and race.  The race appears to feature a seal that would keep road filth out and prolong the life of this quickly-worn part.

Can anyone confirm that CaneCreek.com's Headset Finder is correct regarding CAAD10 headsets?  Has anyone put a non-Cannondale headset into their CAAD10?  Experienced issues having a shop remove a crown race from the all-carbon steerer?  I plan to go to Ride.

Is a lifespan of less than a year normal for a lower headset bearing?  I ride in the rain, but according to my records the headset lower bearing has been removed and slathered with grease at least every 4 months, with play beginning to appear at 8 months of age.
I ride a 2011 CAAD 10.  Ive been riding it several times a week since I got it (in April 2012).  No problem whatosever.  Manufacturer defect?
it's a problem you might only notice if you're looking for it: 
  • grittiness and slowness when turning the handlebars. you'd have to turn them more than you'll ever turn them while riding to notice; on-ride  steering only results in minor turns of the handlebars.  also, used my gf's stethoscope on the headset (no shame.) and you can really hear the bearing struggling.
  • visible brown rust emerging from bearings upon removal from frame. i have removed the seals and repacked with grease to no avail, the balls & races are pitted.
  • significant play in bearings when removed from frame. though generally not a lot of play when in the bicycle, probably due to the tension applied by the headset top cap.
i don't think it's at the point where it's doing any damage to my bicycle, but i like to replace things before they damage rather than after.  once this thing starts to have a lot of play in it, i suspect it may begin to damage other parts of the headset due to excess movement.  my thinking is that if i act now, i can get away with upgrading just the lower bearing instead of replacing the whole system with one of sub-par quality.
I don't have the headset bearing info in front of me, but the bearings used are not "cannondale" per se.  They are a standard dimension that you should be able to find from a number of manufacturers.  FSA produces the ones usually found in cannondale bikes.  

The bearings often have the dimension printed in them in some fashion.  The bearings are often referred to as "drop in" because you can just about drop them in, tighten down the top bolt, and it's ready to go.  Also known as internal.  So, you should be able to pull the front end apart and take a look.  IF it's not there, you should be able to measure inner diameter and outside diameter and height and figure it out from there.  

I would think in this case a bike shop might be easier.
Ordered Cane Creek 110 IS47/33 through Ride Brooklyn.  I'll let you all know how it goes!  http://www.ebay.com/itm/Cane-Creek-110-Int-Bottom-1-1-4-47mm-Head-Tube-Headset-Tube-/390564393078?pt=Cycling_Parts_Accessories&hash=item5aef73b076
Bike computer recommendations please.  I won't be getting a power meter any time soon so some of the nicer options like the Garmin Edge 500 is probably overkill.  I have a CatEye Strada Double wireless on another bike, but I'm not particularly happy with it.

Is a heart rate monitor feature a must have?

@dave ... i have both a garmin edge 200 and 500.  i bought the 200 a while back thinking it would suffice, but then i wanted to measure HR / cadence and had to go to the 500 to do that.  bottom line, i would go with the 500 because it's future proof (even if you did go in for a power-meter one day) and rock solid.

personally i really like having a HR monitor (in lieu of a power-meter).  i am not particularly good at judging my own efforts (for example, i find it difficult to distinguish between a 6 or 8 "effort level") and so having some form of consistent, quantitative measure i think is extremely useful for focused training.

get the 500...since you have hr options...you have power options with a cyclelops power cal hr strap.  Both are good to have.  I always use hr during racing...if I can get my hr under 160 during a race, I know I can attack or go with the next move.  Physiologically correct? Probably not....Psychologically correct = definitely !
I bought my first pair of Sidis and came across an "adhesive sticker" in the Genius 6.6 box. I am guessing I am supposed to attach them to the sole to keep the cleat (Look Keo) from slipping on the carbon sole. The instructions lose something in translation as they read:  'We suggest to stick it on the plate of the chosen pedal'. Aside from the strange directions, has anyone installed them on their shoe/cleat? Has anyone had a cleat slip on carbon soles because they did not use the sticker? Inquiring minds want to know.